
Test: Palmer Grand Audition MKII
from guest author Daniel Bigaj, infomusic.pl
A simple, analog and well-designed splitter with a number of useful features and capabilities as well as highly intuitive operation.

Palmer. This is not the first thing from the company I have worked with, nor the first one I’ve had the opportunity to test. I can’t hide the fact that having experienced many of their products means I have formed an opinion about them. With something brand new from them, namely the Grand Audition MKII, I’ll be checking to see if they are holding their products to their appropriate standard.
The Grand Audition is from the “signal splitters and switches” category, and is designed for listening to different loudspeakers under the same conditions (although I see more possibilities here). Certainly musicians are familiar with the ABI, ABO and DMS series (although they are used for different purposes), while concert/event technicians and permanent installation teams are more familiar with pressboxes and all kinds of microphone- or line splitters. Grand Audition MKII certainly fits into this series, as it is a classic signal splitter, but interestingly developed and, note, equipped with a control application (I’m just waiting for pressboxes to have this feature, because it’s another step further) and which I will describe later in the test.
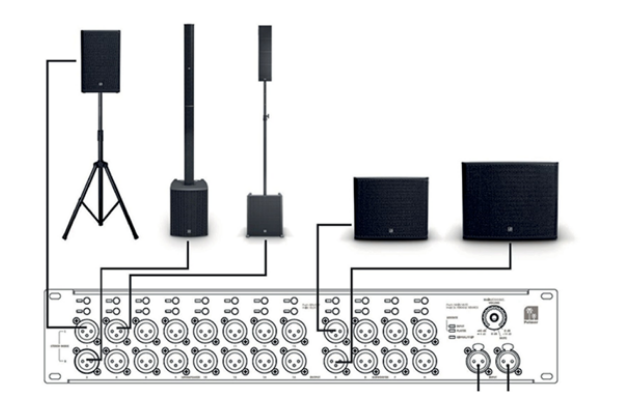
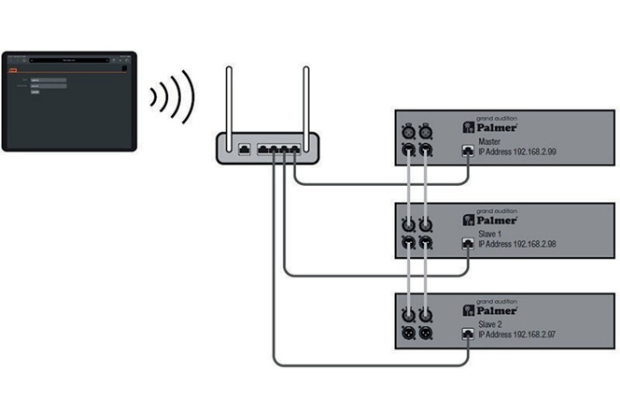
What is it for and where would it be useful or even necessary? The manufacturer’s intention is that the user should be able to present various sound systems, both passive and powered, at a store, trade fair etc, and be able to control them from one device without the need to add a mixer with 24 outputs, for example. This is shown clearly by the picture in the manual. And how is this done with the Grand Audition MKII? Let’s take a look at the front and back panels as well as the app to see what Palmer offers and how it works.
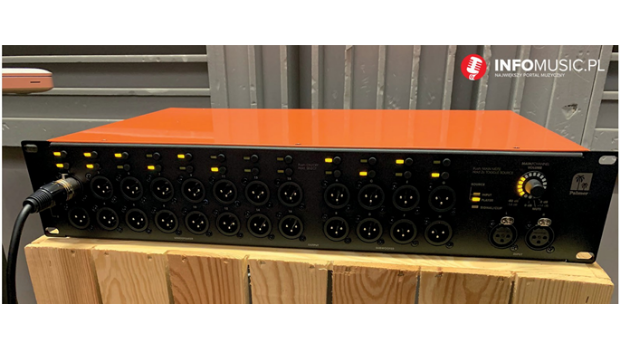
FRONT PANEL
Let me start by saying that it is very well made, which we are already accustomed to with Palmer. Everything looks solid, well-placed, fitted and well thought out. The color scheme of orange and black suits me personally, and I noticed some time ago that browns, oranges and blacks have recently come to dominate the new Palmer hardware series, including their website. You can see that someone has paid attention to the design – which is good, because it’s well known that it affects the overall experience. However, let’s take a look at the technical aspects of the MKII.
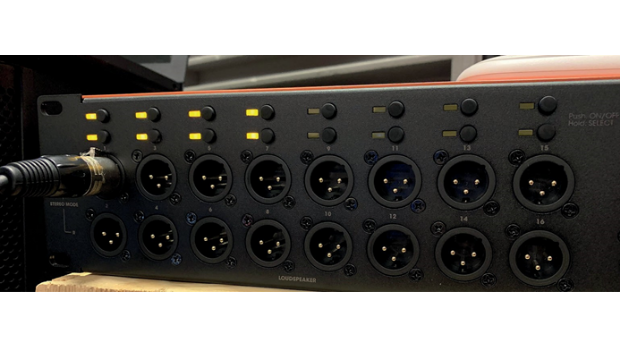
On the left we can see all LOUDSPEAKER outputs, in the form of 16 XLR sockets. They are numbered by columns and can form either 8 stereo (1-2, 3-4, 5-6 all the way up to 15-16) or 16 mono outputs. Above each column there are two buttons which can be paired (like the outputs) or used separately. There is a LED next to each button that shows whether the output is on and its configuration – mono (the selected channel LED is on) or stereo (both are on). These buttons also have configurable output volume (yes, each of the 16 mono outputs or 8 stereo outputs can be adjusted separately).
The operation on the device works as follows: first hold down the button for one channel or pair, wait a moment for the LED to flash, and then use the endless rotary encoder over on the right, labeled MAIN/CHANNEL VOLUME, to adjust the selected output.
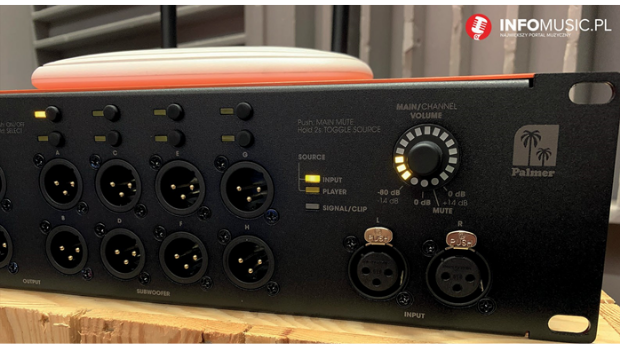
This is very useful if you want to set the output level for each individual channel from the unit. By the way, it is worth noting an advantage while operating: simple operating messages are labeled on the front: this section includes the following information Push: ON/OFF and Hold SELECT. This also applies to the SUBWOOFER section, labeled (also in columns, not rows) with the letters A through H, where you can connect 8 subwoofers if you need to create a configuration like: stereo pair 1 – 2 and a subwoofer from set A. This allows us to control the systems where the sub has a built-in cross-over, as well as to control a sub or subs separately, to be able to show how they sound, or to compare them alone, without any satellites. Like the Loudspeaker section, the outputsection of Subwoofers are completely controllable.
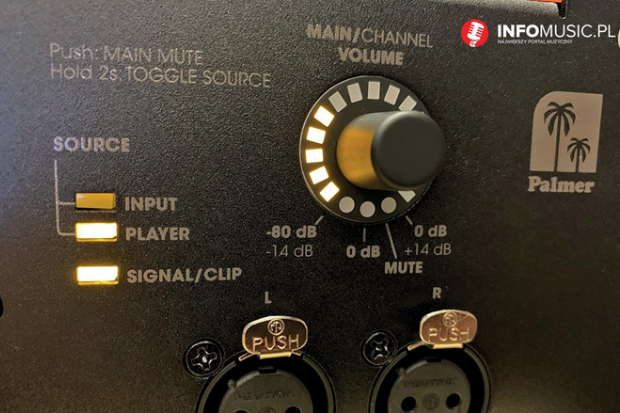
As mentioned earlier, when properly selected can control the signal level of each output separately, as well as the volume of the whole set, and with the MUTE function (by pressing the knob) you can immediately mute the whole set. In turn, by holding down the knob for two seconds (see the message Hold 2s: TOGGLE SOURCE) we can select the sound source, which can be either the input in the form of XLR inputs on the front or rear of the MKII or… the player, about which I will devote more attention when discussing its use, but in short PLAYER is a file player, as you can easily guess. There is also a LED indicating overdrive of the input signal, the sensitivity of which can be controlled (-6dB, 0, +6, +20 dB). OK, we now know what’s on the front and what it does, but what’s on the back?
BACK PANEL
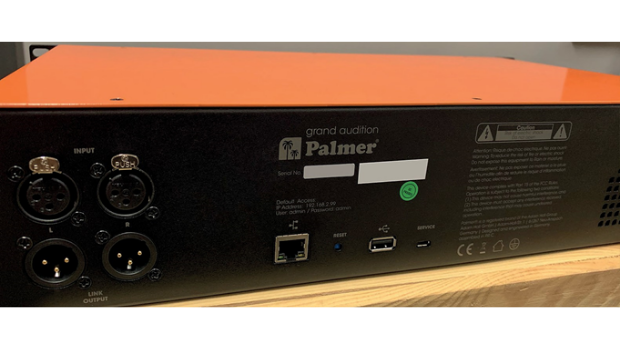
Here we can see XLR inputs (you can use the ones on the front or on the back interchangeably) and XLR outputs for linking the signal between devices, of which we can connect as many as three together, giving us 48 mono outputs or 24 stereo LOUDSPEAKER outputs and 24 subwoofer outputs.
Then there’s a network socket for controlling the device with an app (again, an informative description on the unit; IP address provided and default user name and password), as well as two USB sockets. USB Type A is used to connect USB sticks formatted to FAT32 (supporting audio stored in mp3, flac, ogg, wave and aiff formats), and USB Type C is used for service operations. We also have a RESET to restore the factory settings if we need to delete everything in one go. A more detailed description of how to cascade equipment, as well as the operation of the player and the network connection to the control software, can all be found in the section describing the application.
APPLICATION
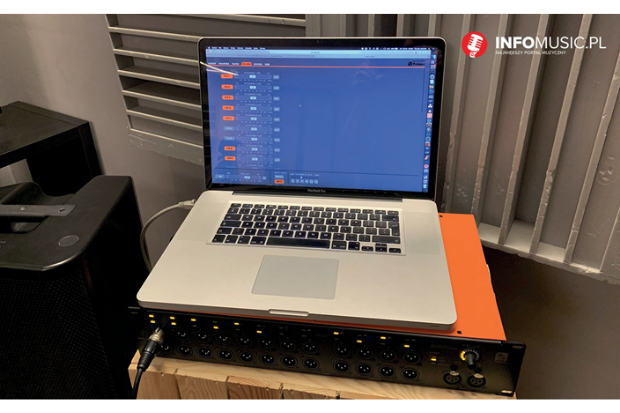
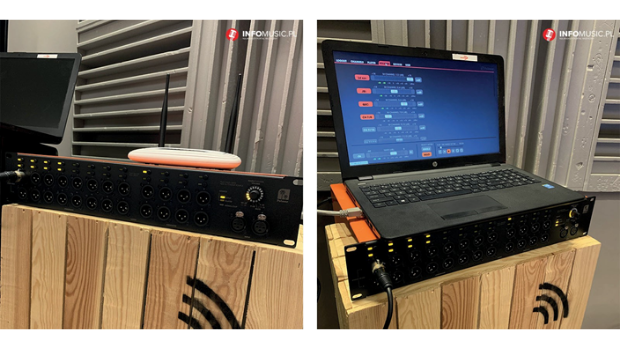
The Grand Audition can be controlled via an app, as I’ve already mentioned, but I’ll expand on it now and give you a closer view on how it works. First a brief description of how to connect to it. We can find an accurate and detailed description in the manual, which in general is very clearly written – this applies to all parts of the splitter, but it is not long and contains everything we need to know. Anyway, there’s no denying that even without it, most of the functions are intuitive, but when it comes to the app and how to connect it, it’s worth looking through the manual. We can connect to a computer using a cable, or we can do it wirelessly for any computer or tablet. It doesn’t matter what system you use, as it is a browser-based solution. It has the advantage that it will work everywhere, because all you need is… a browser.
The first method: connect the network cable from the Ethernet port of the Grand Audition to the Ethernet port of your computer, enter the IP address and subnet mask given in the manual in the appropriate places (this is described in detail in the manual for both Microsoft and Apple systems). The connection is very simple and anyone can handle it. Then open any browser, type in the next IP (from the instructions) and you’re done. We log in as “admin”, password “admin” (we can change it later, of course) and that’s it, we’re in the hardware control panel.
For a wireless connection we need a router plugged into the Ethernet port of our splitter, and then we follow the instructions to make changes in the router, then the IP address in the browser of an iPad, for example, and voila, there we have it. We log in as mentioned above and gain access to the control application.
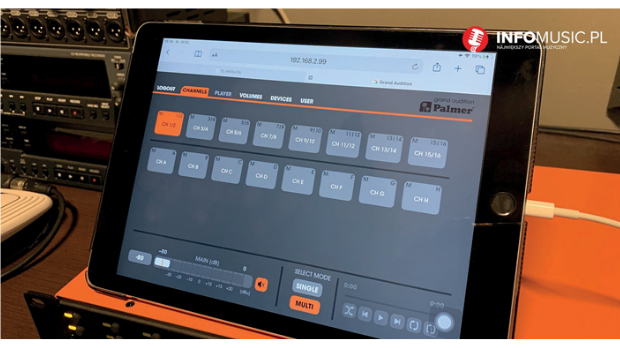
What does it do? It’s simple and intuitive. Everything you need to operate the splitter can be found easily. The color scheme is gray-orange, where orange indicates that a feature is currently in use. We’ll check all the tabs, one at a time, starting from the left. The CHANNELS tab shows us all LOUDSPEAKER outputs (paired or unpaired, depending on what we selected) and SUBWOOFER. Below them, on the left (displayed in all tabs), we have the main volume, or MAIN, and the mute button, then SELECT MODE, with two modes: SINGLE mode, which means that you select one output (stereo or mono + one sub), and when you press another then the previous one turns off. Right next you will find the player control (play, stop, previous or next song, repeat all or selected song, random playback).
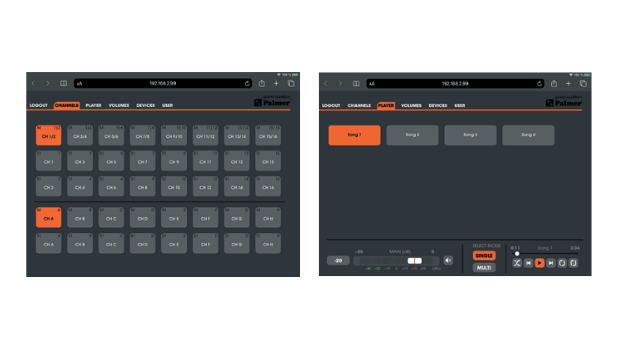
The next tab is PLAYER – it will be active if, in the DEVICES tab, the input is set to PLAYER instead of XLR (you can also do it from the front panel). This internal player reads files directly from a USB device plugged into the USB A socket located on the back (described in the section about the back panel), suitably formatted (FAT32) with files in mp3, flac, ogg, wave, or aiff formats, which I also mentioned earlier. I checked it out, it loads folders and song titles nicely, shows the time correctly, and plays the songs without a problem.
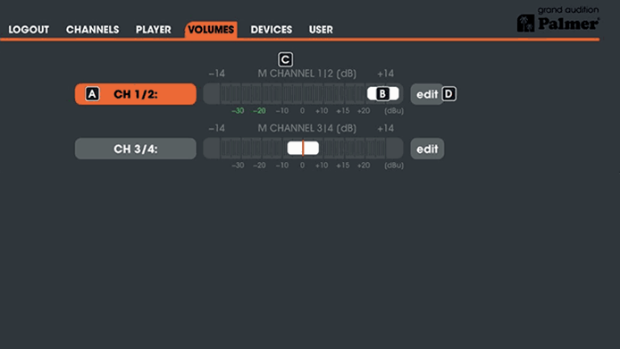
Let’s go to the next tab, VOLUMES, where we can do two important things. First we can relabel the outputs with different names, such as the company name and the model we are testing. Secondly, set the output level of each channel or pair of channels separately, so that all devices connected for the presentation can play at the samelevel. This allows us not only to control the presentation of loudspeakers, but also makes it easier for the customer to control the system.
DEVICES tab. Here we choose from which source to take the signal (XLR or PLAYER), the sensitivity of the inputs (-6 dB, 0 dB, +6 dB, +20 dB), and whether the outputs should be stereo or mono. Then the network settings (IP, MASK, GATEWAY etc.) and the settings related to adding new GRAND AUDITION MKII units, of which we can have up to three (MASTER and SLAVE 1 and SLAVE 2). By the way, here is a brief description of how to do this. The XLR outputs on the rear panel are used to transfer sound between devices in the simplest way possible, OUT to IN, OUT to IN – it couldn’t be simpler and it is certainly an advantage. However, in order for the devices to see each other on the network and know in what order they appear, it is enough to select the appropriate addresses from a selected pool of IP addresses. The master in this case has the address 192.168.2.99, the first slave 192.168.2.98, and the second slave 192.168.2.97. Everything is simply and clearly described in the manual. We can choose which devices work in mono and which in stereo, which gives serious possibilities as to how to expand the number of outputs and connected sound sets, up to 48 mono or 24 stereo, for example: 16 stereo and 16 mono LOUDSPEAKER and 24 SUBWOOFER. Each channel, of course, can have its output level controlled separately.
And the last tab, USER. Here we can change the password to something other than the famous ADMIN, change names and add users (with their settings). The app (as well as the device as a whole) did not cause me any problems. It ran smoothly on a computer and on a tablet, did what I wanted it to do, was simple and intuitive, as was the whole splitter anyway.
SUMMARY
After playing with this splitter, I didn’t feel disappointed. I must add that the Palmer Grand Audition MKII is neutral to the signal, and doesn’t cause any changes or distortions due to analog processing (I checked on two models of active speakers). A simple, analog and well-designed splitter packed with useful features and capabilities, with very intuitive operation both when using the app and directly from the front panel. An additional advantage is the low weight and possibility of rack mounting. I recommend it for hardware stores, any trade shows, presentations and trainings.
TECHNICAL SPECIFICATION:
Type of product: Switches
Type: Analog
Audio processing: Analog
Ethernet Functions: yes
Inputs: 2 x balanced Outputs: 24 + 2 balanced
Controls the front panel: 1 x encoder pushbutton, 24 x pushbutton
Display elements front side: 2 x signal source LED (XLR / Player), dual-color signal/clip LED, LED ring for main/channel volume with 0dB and mute LED indicator
Front panel connectors: 2 x XLR 3 pin female, 24 x male XLR socket
Controls on the back panel: Power On/Off, mains voltage selector, Reset
Rear connections: 2 x XLR, 2 x XLR 3 pin female, 3-pole IEC mains connection (mains socket), Micro-USB for service purposes, RJ45 (Ethernet), USB stick
Operating voltage: 100 V AC-240 V AC/50-60 Hz
Safety: T 630 mA 250 V
Power consumption: 65 W
Ambient temperature (during operation): 0 – 40°C
Installation height: 19“ / 2 U
Dimensions (W x H x D): 482.6 x 89.4 x 282.3 mm
Housing material: Metal
Cabinet surface: Powder-coated
Weight: 5.7 kg
Copyright © INFOMUSIC 2021
This might also interest you

Honouring the past, driving ...
8. July 2025

Paul McCartney’s Wings tou ...
7. July 2025

Rich bass instead of engine ...
2. July 2025
Recent Post


Popular Posts


UK Show Space – Now Open! A Recap of the Opening
January 31, 2024